

This isn’t a blog post arguing that “multi-touch attribution analysis” is dead or whether you need a CDP to do it right. Those are all worthy pursuits and worth your time in exploring.
This blog post is for MOPsPROs - which means I’m going to assume the following:
- I don’t need to sell you on the idea of multi-touch attribution and why your marketing team needs it
- Your company uses Salesforce as your CRM and a leading Marketing Automation system is paired with it.
- You’re using Salesforce Campaigns to track a lot of your marketing efforts
- You want to get started with multi-touch attribution but are not yet ready to buy this solution from yet another vendor.
- You (or someone else on your team) is an SFDC Admin and are comfortable making changes in SFDC
So if you’re ready to roll-up your sleeves and build something cool for your marketing team in Salesforce using the latest “Low Code” features than this is the post for you!
I’ll be using Salesforce Lightning Flows for this solution.
To learn more about Lightning Flows, start with this helpful Trailhead course.
Results When You’re Done
Here’s what you’re building: a button on an Opportunity in Salesforce that will calculate the influence of marketing campaigns that influenced the Opp using the “Equal Touch” model - ie it’ll divide the Opportunity Amount equally among all of the qualifying campaigns.
Here’s what the button will look like (if in Lightning):

And here’s what will happen when you push it:
Push the “Run Attribution” button:
The flow will then produce this attribution data for an Opp:

And you can then use it to create beautiful reports and dashboards that look like this:
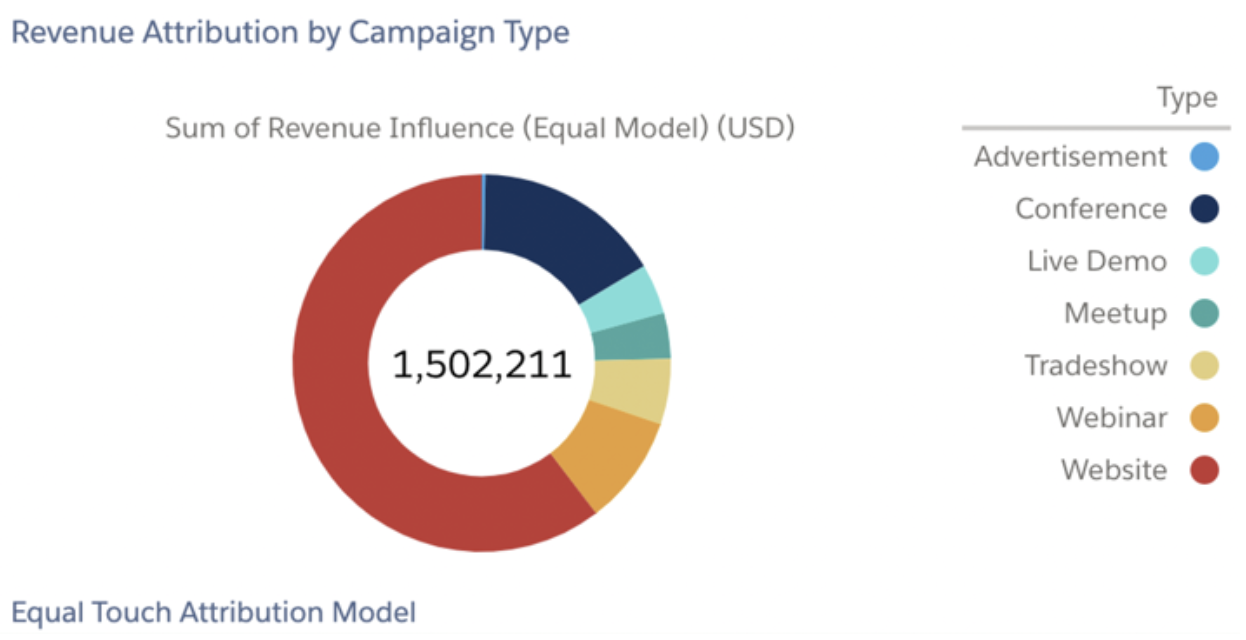
And this:

Well, almost - I mean we’re building a button - so you’d have to click the button individually for each Opportunity which isn’t practical if you have lots of Opportunity data but it is a good way to get started. Once you master the button, you can continue to modify your Flow to handle multiple Opportunities at the same time - automatically.
Step-by-Step Guide
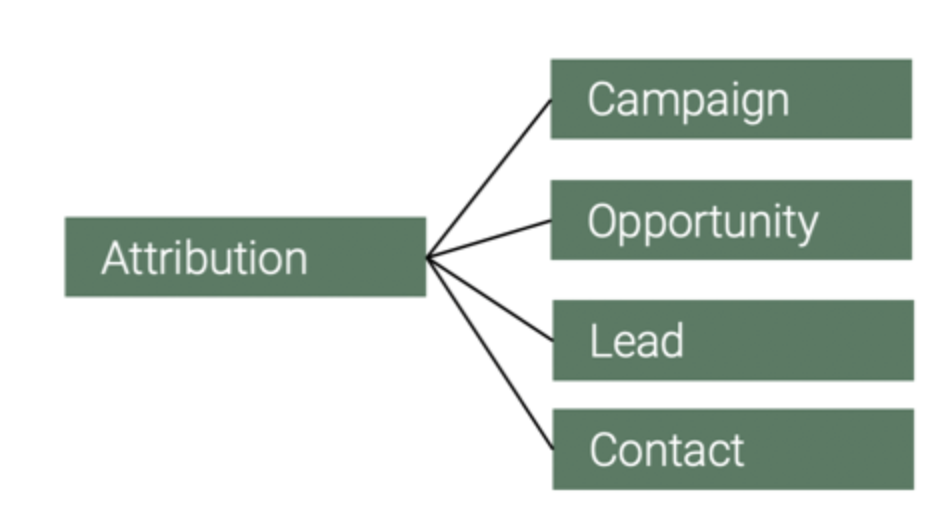
Step 1: Create Custom Object - “Attribution”
This will be a new table in Salesforce where the attribution specific data is stored.
The “Attribution” object will have links to the Opportunity, the Campaign and the related Lead or Contact records so it’ll be simple to cross-reference data from each object back to the Attribution.
Go to the Object Manager and select Create -> Custom Object
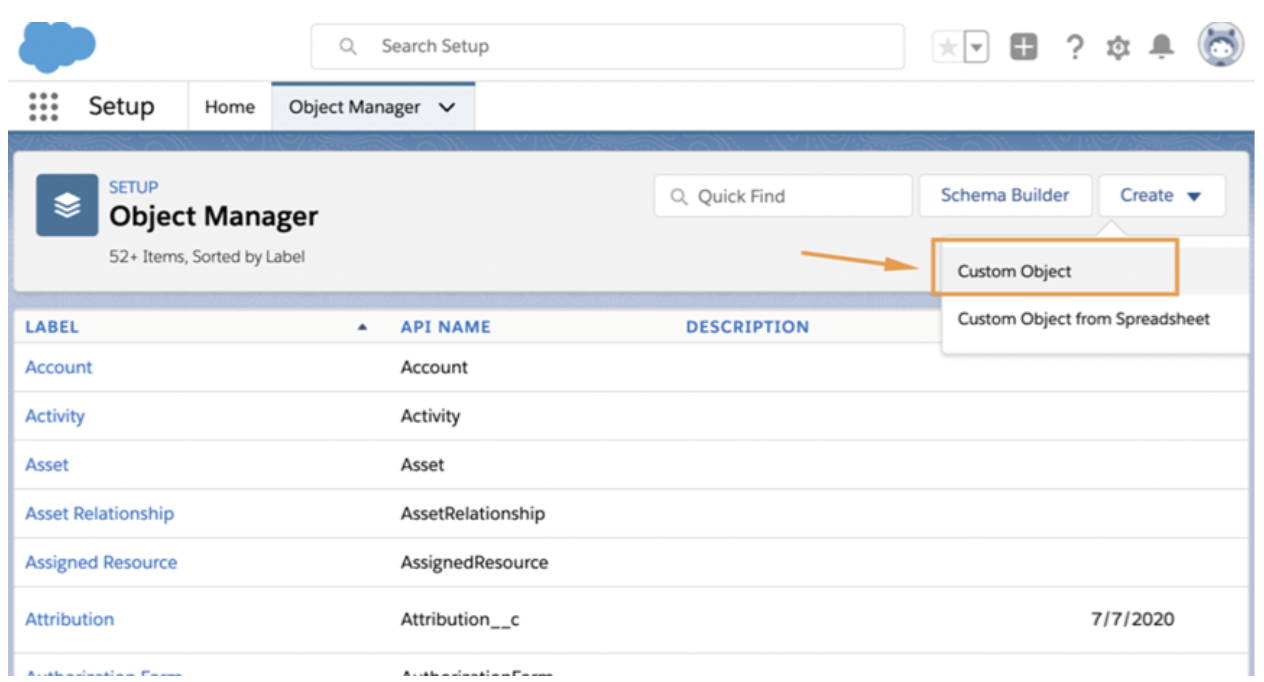
And create the new object:
- Label: Attribution
- Data Type: Auto Number
- Display Format: A-{0000}
- Starting Number: 1
- Optional Features: Allow Reports
You’ll then need to create the following list of fields on the Attribution object:
Create Custom Fields on custom object ‘Attribution’
It’s pretty important to make the Attribution-Campaign relationship a Master-Detail instead of a simple lookup. The reason I do this is that it’ll make is super easy to later create a roll-up summary field on the Campaign summarizing all the of the Attribution records back to the campaign:
Step 2: Create a couple of custom fields on Campaign Member
We’ll be doing “Account-Based Attribution” - which means that our button will be looking for any campaign with any person related to the Account, and not necessarily listed as the Contact Role on the Opp.
To do this, we need to list the AccountID on the Campaign Member object and this is what our flow will be looking for when searching for “campaigns with this account”.
You’ll create a formula called “AccountID” that looks like this:
If you’re using a Lead-to-Account Matching service (like LeanData) then you can make sure that when you’re doing marketing attribution, campaigns with Leads that are matched to the Account with the Opp also get influence credit.
In that case, your formula will look like this:
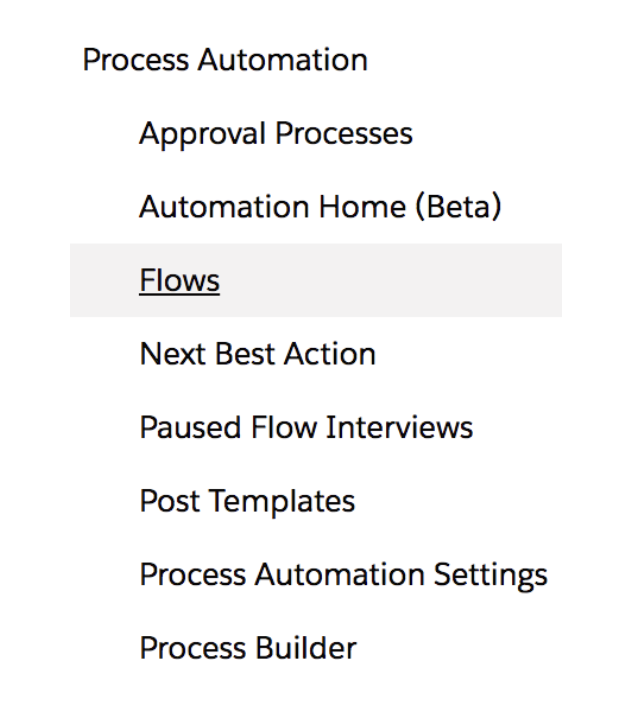
Step 3 - Create Process Automation Flow:
Goto Setup > Process Automation > Flow > New Flow
Now select ‘Autolaunched Flow’ and click to Create

Add New Resource

Now we will add 2 Resource as Variable type

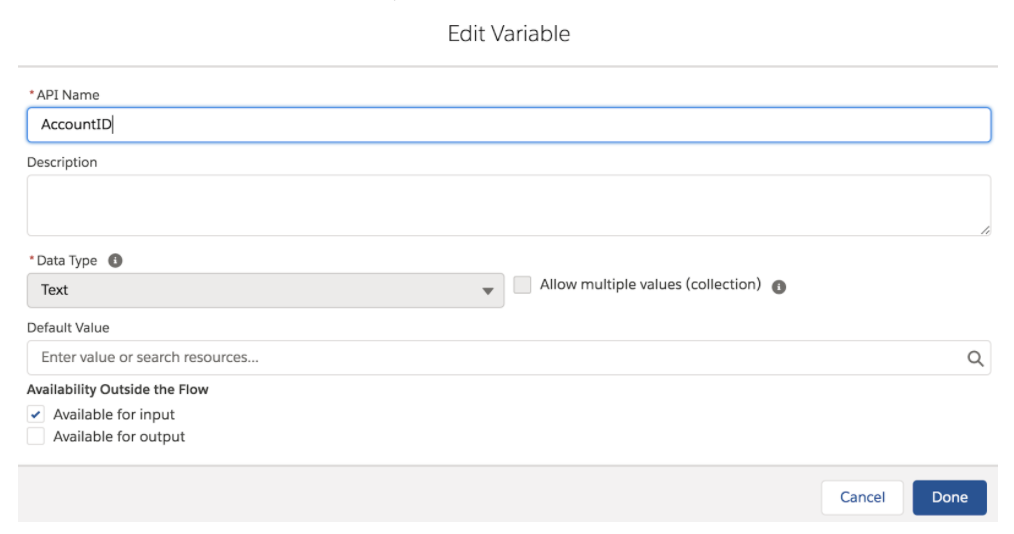
Account ID
- API Name: Account ID
- Data Type: Text
- Availability Outside the Flow: Available for data input
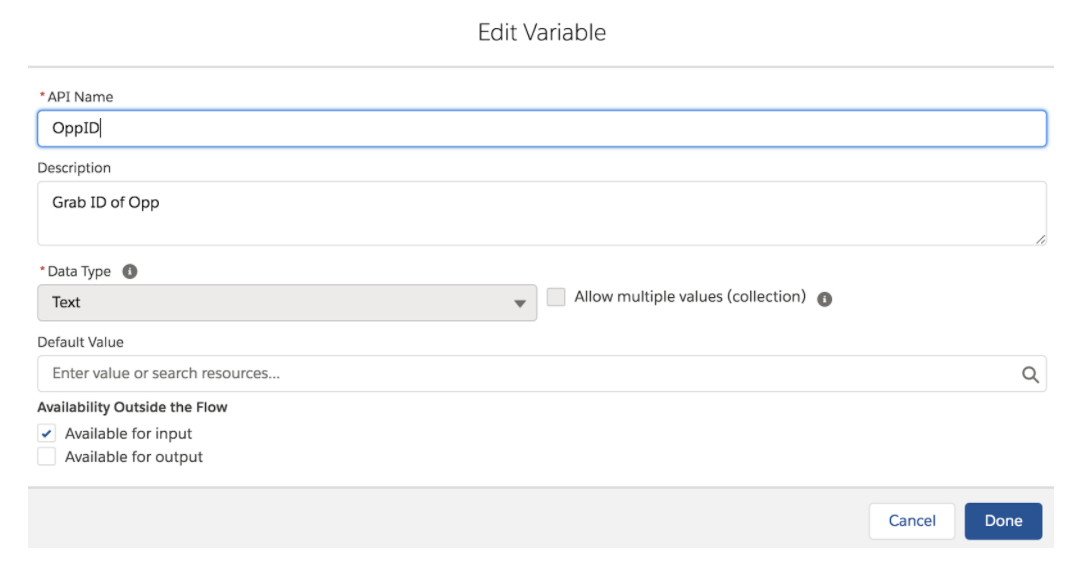
OpportunityID
- API Name: OppID
- Data Type: Text
- Availability Outside the Flow: Available for data input
The purpose of these variables is to pass Opp ID and Account ID from the Button to the Flow. When you click the button, you’ll be populating these variables with IDs which you’ll then use throughout the flow.
So - now we’re ready to go get some campaign members.
We’re going to be looking for any Campaign Member where the AccountID field (that we created in Step 2) matches the Account ID of the Opp where the button is being pushed!
Drag and drop ‘Get Records’ to the canvas

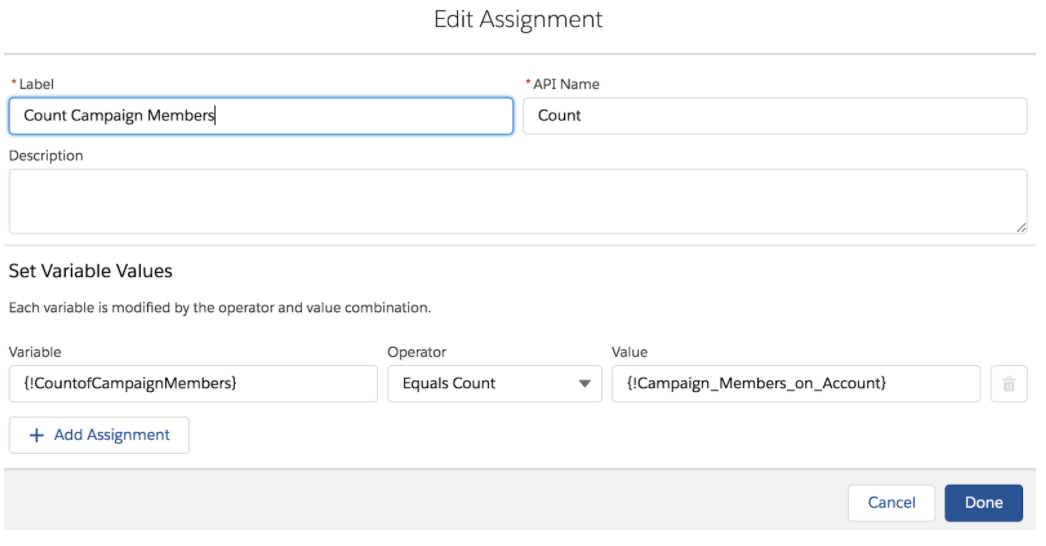
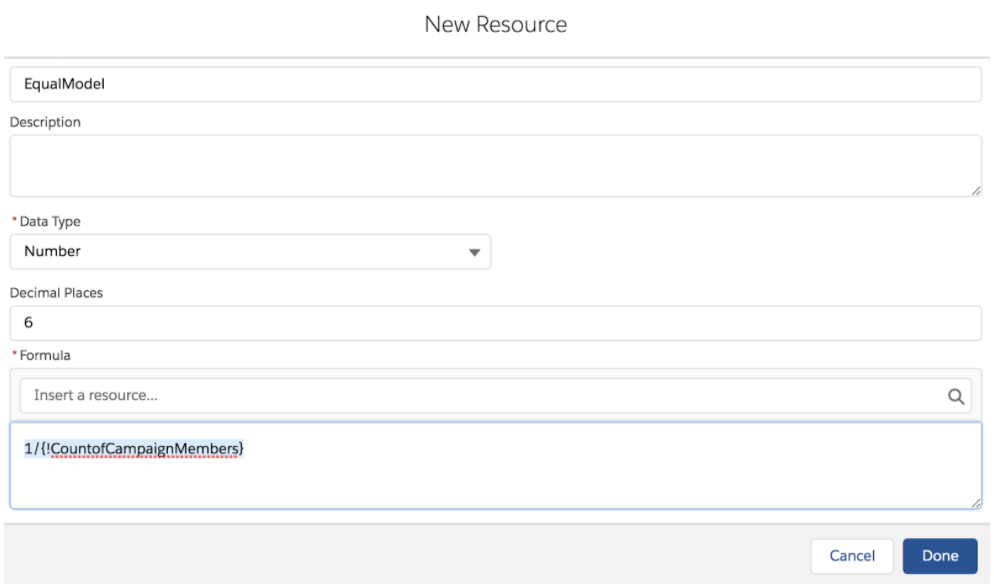
Now that we have our Campaign Members, we want to know how many of them there are.
Add New Variable:
- API Name: CountOfCamapignMembers
- Data Type: Number

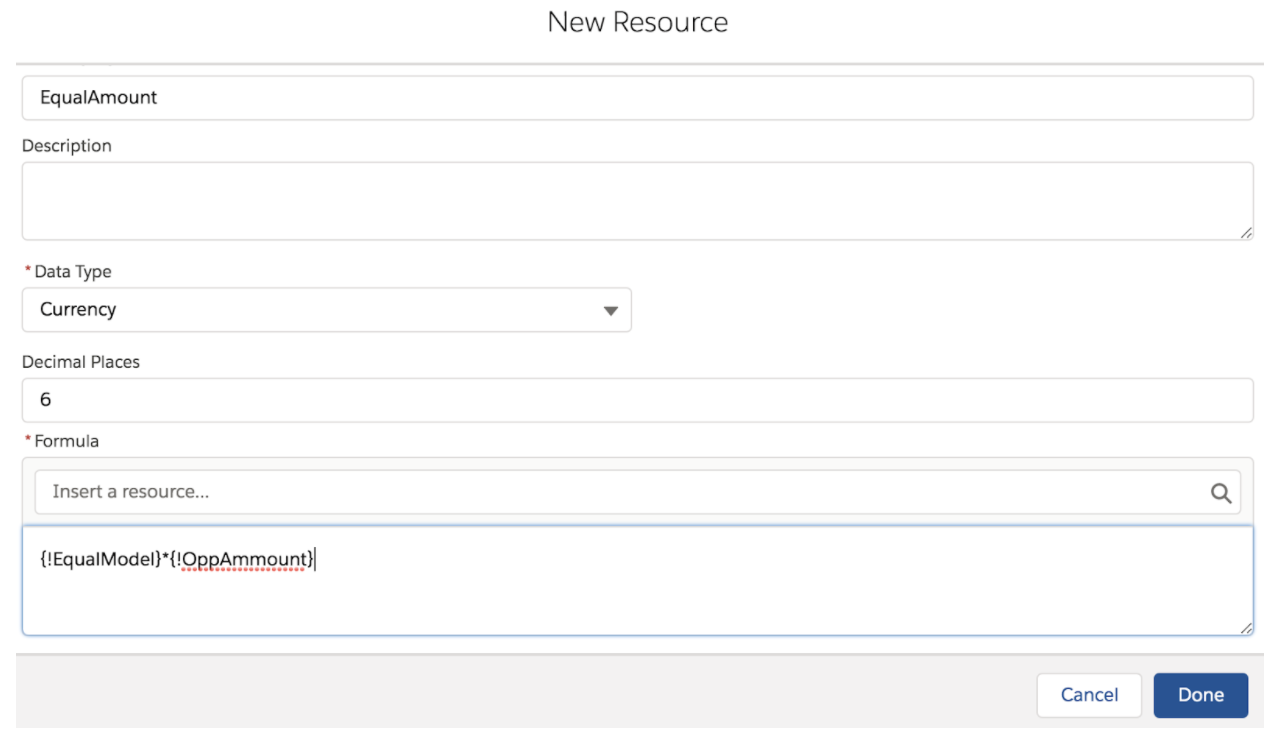
We also need a variable to store the Opportunity Amount:
Now that we have the Opp Amount field and we know how many Campaign Members there were - we can calculate the Equal Split attribution model by simply dividing the two numbers!
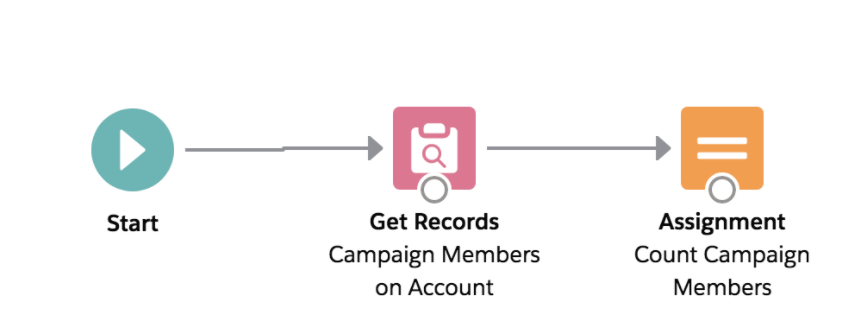
This is how your flow should look like ->
Now save your Flow and let’s call it “Attribution Button”
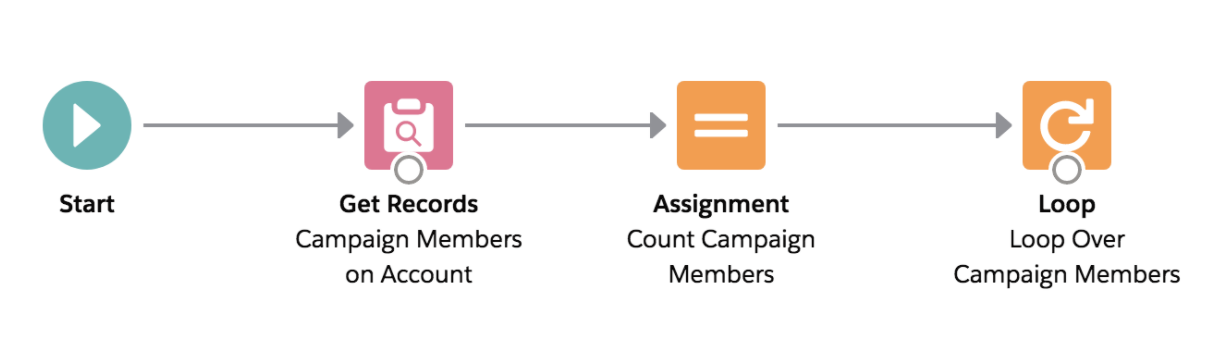
Step 4: Continuation of Flow build - “Looping”
We’ll be adding a Loop to our flow and this is arguably the trickiest part of the whole thing.
Here’s what we’re doing: we’re looping over each Campaign Member, and for each one we’re defining an Attribution record that has the attributed amount, and links back to the campaign, the opp and the lead or contact. We then store this attribution record in a “collection” and move on to the next Campaign member in the loop. And once we run out of Campaign Members to process, we will take the Attribution records defined in the collection and create them in SFDC as records.
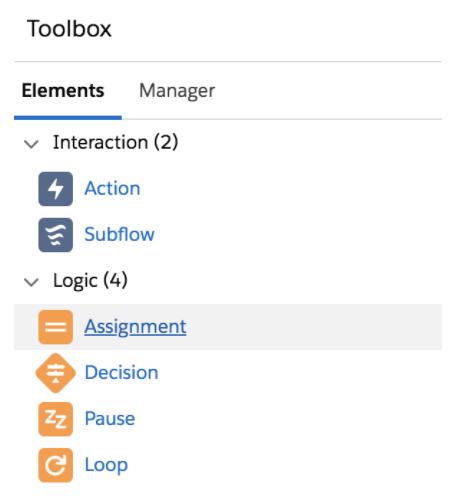
Add Loop to the Flow:
- Drag and drop to add Loop to your canvas
- Label: Loop Over Campaign Members
- Select Collection Variable: {!Campaign_Members_on_Account}
- Specify Direction for Iterating Over Collection: First item to last item
- Select Loop Variable: {!SingleCampaignMember}
So far we have built structure with Automation flow where the process looks:
Get the Records > How many Records do we have? > Enter the Loop
Now lets add a step more to create a collection of records and write it back to SF for Attribution. In order to do so we’d need to add a Variable.
Create Variable
- API Name: SingleAttributionRecord
- Data Type: Record
- Object: Attribution
Create Variable
- API Name: CollectionOfAllAttribution
- Data Type: Record
- Allow multiple values = TRUE*
- Object: Attribution
Let’s add element type Assignment for collection of records.
- Drag n drop Assignment to canvas
This is how we define an Attribution record - we populate each field with data we’ve gathered from the Campaign Member and calculations we made in the flow.
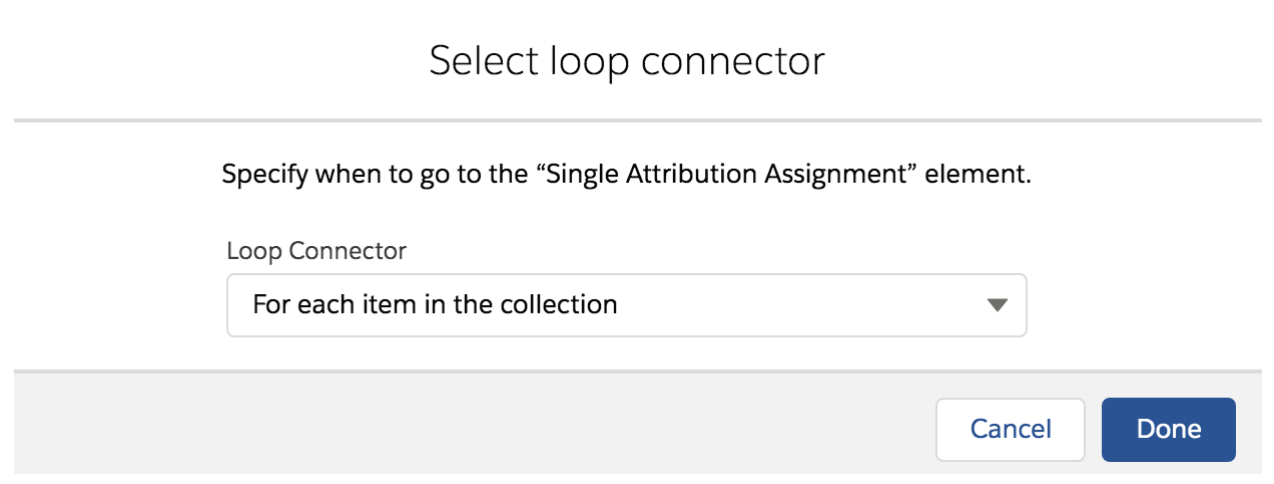
Connect Loop with Assignment
Loop Connector: For each item in connector
Once the Assignment is defined we would need to put in a Collection. Which we would need to define Collection of Attribution and add (+) to SingleAttributionRecord.
Add another Attribution element to the canvas of Flow
- Drag n drop Assignment to canvas

Now Connect your SingleAttribution Assignment with Put into Collection Assignment.
And then connect Put into Collection Assignment with the Loop. This is how the flow should look
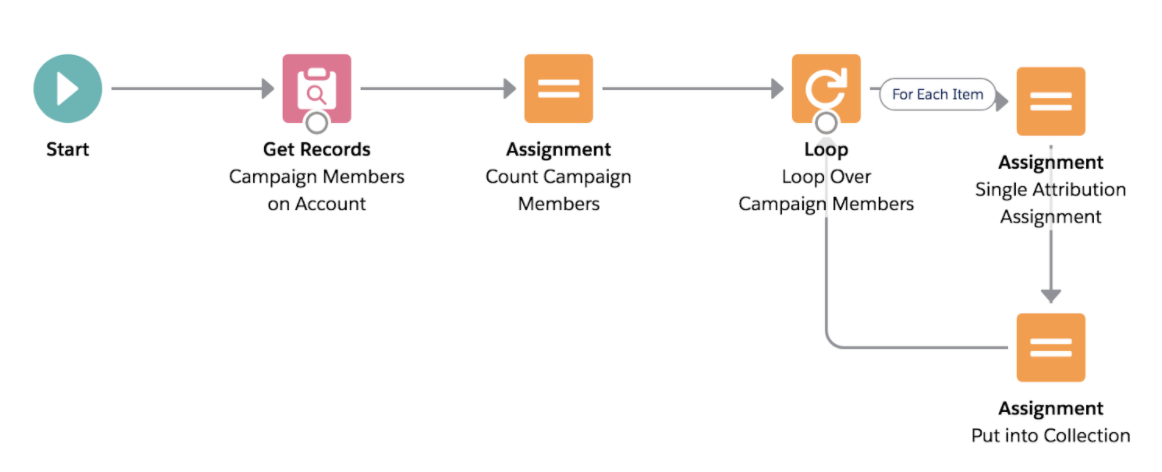
With the above flow, each of the campaign members will get added to Single Attribution and all the Attribution records and will be passed to Collection of Attribution. Now to fetch all the attributions we would need to add the ‘Create Record’ element to the above flow.
Add Create Record Element
- Drag and drop ‘Create Records’ to the canvas
- Label: Attribution Records
- How Many Records to Create: multiple
- Select Values to Create Multiple Records: {!CollectionOfAllAttribution}
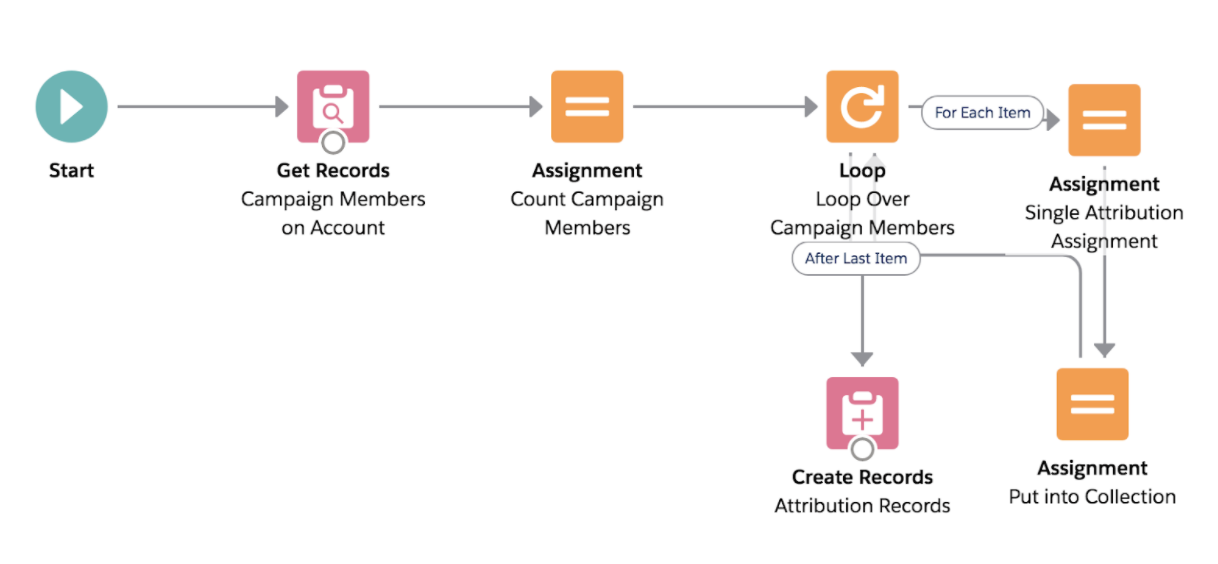
Our flow is now ready to be summoned by a button!
Step 5: Create Attribution Button on Opportunity Object
If you’ve never created a custom button in Salesforce you really should! Buttons are fun to press and to play with, regardless of their actual utility. Think of how fun elevators are! And sometimes it’s comforting to know that there is a button available to press when you might need it, even if you go through life never having to actually use itt.
Here’s a great trailhead on custom buttons more generally.
Goto Setup > Opportunity Object > Buttons, Links, and Actions > New Button or Link
Label: Run Attribution
Display Type: Detail Page Button
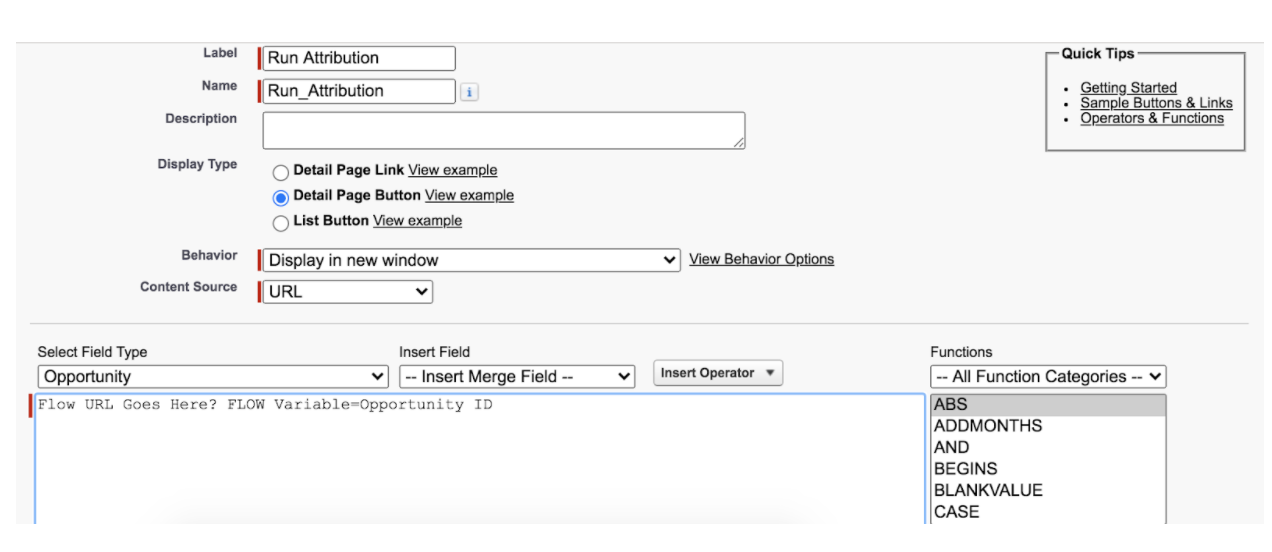
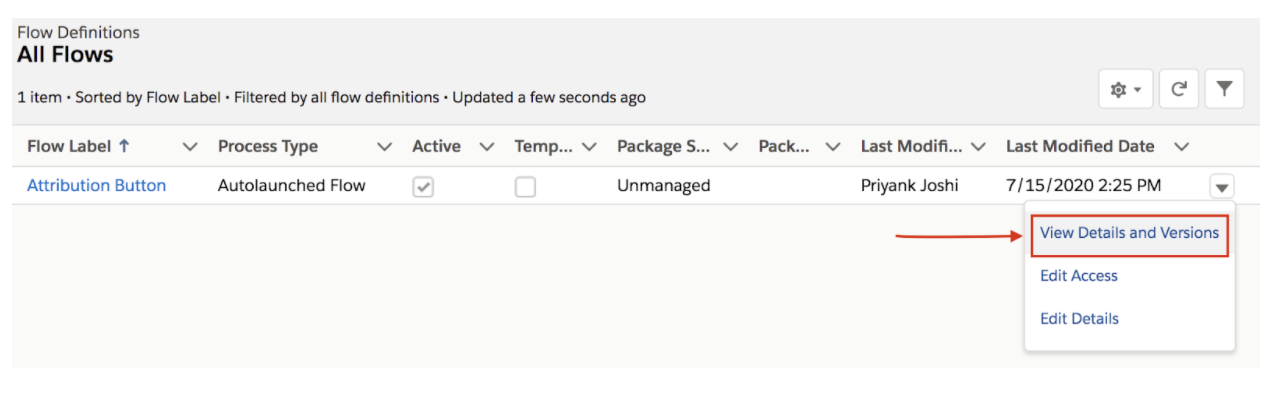
Open another window and Goto Flow > Attribution Button > Click on dropdown arrow to select >View Details and Versions
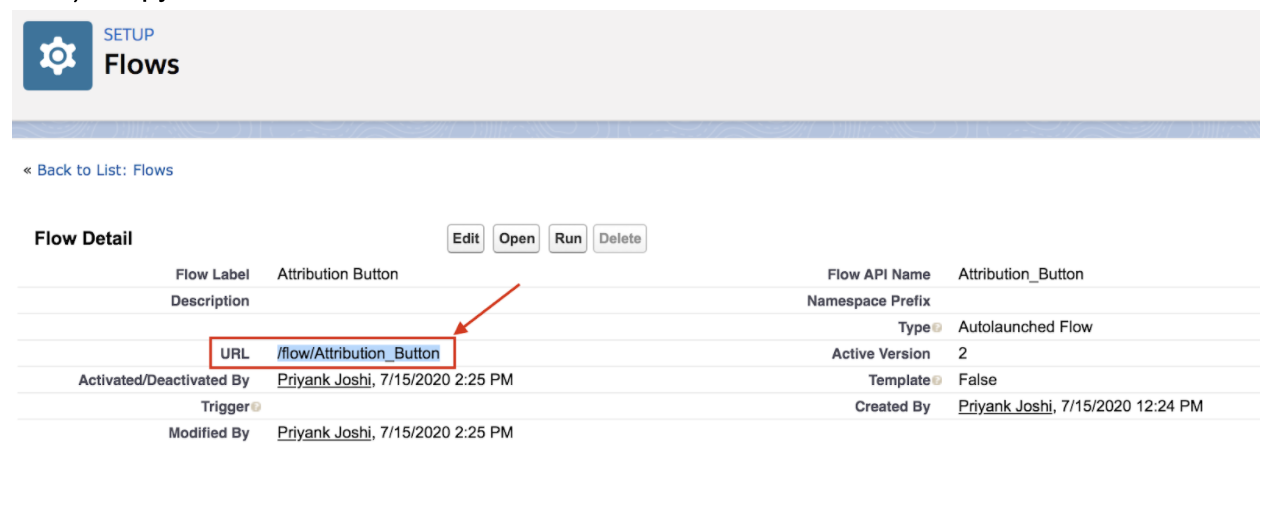
- Copy the URL
- Paste the copied URL to your formula canvas along with Flow variable, this is how your formula should look like
Flow URL?(OppID)=OpportunityID&AccountID=Opportunity.AccountID&OppAmount=Opportunity.Amount
- Flow URL: /flow/Attribution_Button
- Flow Variable which is created in this step: OppID
- Opportunity ID: {!Opportunity.Id}
- Flow Variable: OppAmount
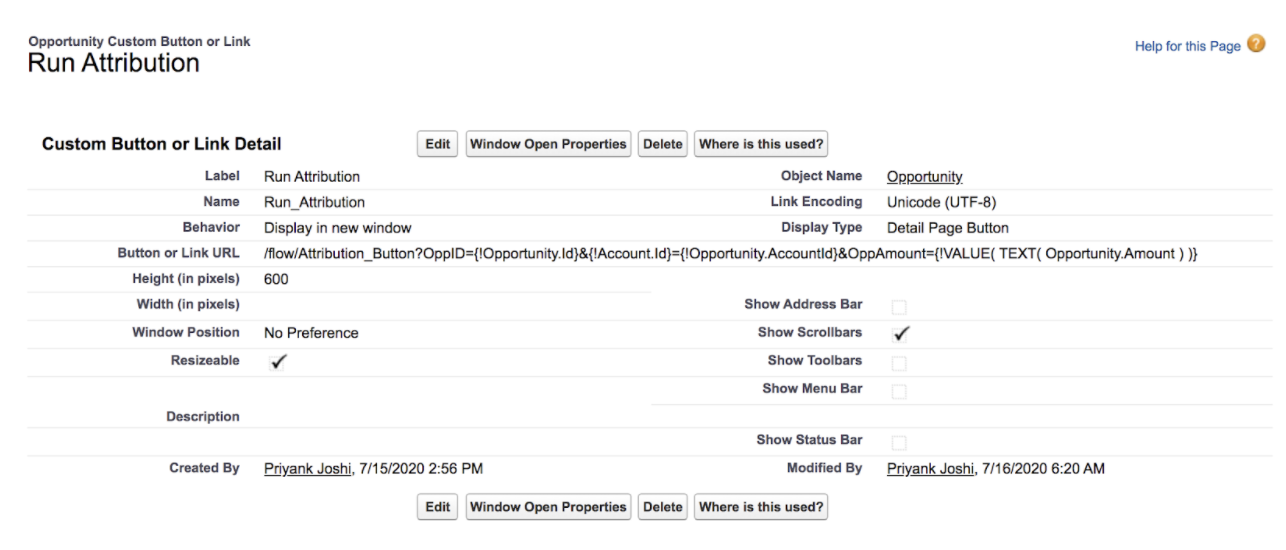
Now let’s build SOQL for our Run Attribution Button Link -
/flow/Attribution_Button?OppID={!Opportunity.Id}&{!Account.Id}={!Opportunity.AccountId}&OppAmount={!VALUE( TEXT( Opportunity.Amount ) )}
NOTE: In order to pass currency value to Flow variable it should be converted first to text value.
3. Check Syntax
4. Save
Now, add the ‘Run Attribution’ button and Attribution Custom object fields to your Opportunity Page Layout.
1. Go to Opportunity Page Layout > Edit > Add fields from Attribution (Custom Object).

2. Within the Opportunity Page Layout > Buttons > Run Attribution

3. Drag and Drop Run Attribution button to Opportunity Detail Section and click to Save.
And that’s it.
You now have a button on the Opportunity page that will calculate marketing influence using an “Account Based Multi-Touch Attribution Model” - which is awesome that you can just make it yourself.
Go ahead and test it thoroughly and once you’re satisfied that it works show it to your colleagues! They’ll be very impressed!
Also let me know if you run into any issues or if you have any additional questions or suggestions. I would love to hear from you!